Moving to the farm life for our dog…and our kids…and us. A journal of adventures and misadventures learning to homestead. Primarily a journal by Mom on various projects and learning to be more self-sufficient.
Working on the fall garden planning, I realized that on my humble little homestead I have grown over 70 different varieties of plant this year. From apple trees to peaches to corn and bell pepper, I’ve tried it all. Saying that, it hasn’t been without its challenges. Squash bugs and vine borers got into my squash patch, and I had to pull the plants this weekend and burn them. Thankfully, I was able to harvest quite a bit of squash before it got bad, but I had been hoping to be able to preserve more than I did.
Next year I have my game plan ready – rotate the squash to a new area, watch more closely (they were full harvest before I really knew I had a problem), and I’m going to try a roof shingle/board trick I learned about online. I will make another post about that soon.
Last night I was looking on Etsy for seeds for the fall crop, and got a little excited. I ended up ordering 12 or so seed packets, and I expect to have quite a few extra. The thought crossed my mind that I could possibly get a farmer’s market booth or find a local store to sell the extra plants, but the thought terrified me. I’m an accountant by trade. My farming skill is less than three years’ old (except for the odd patch or flower garden), and I was today years’ old before I even KNEW what a vine borer was.
Saying that, I give away quite a few eggs, and I’m always hocking off some plant experiment to family, so… maybe, why not?
I used to be a painter/artist as well, and quit when my kids were little.
The more I think about it, the more I wonder if it might be worth a shot to set up a small booth and learn on the fly. What do you think?
PS – sorry for the quiet. I have been spending 6 hours a day on the homestead, but I feel like I’m getting a handle on it. Definitely room to improve!
Complete candor and honesty – I have historically been PETRIFIED of home fermentation projects of any kind. This includes pickling, canning, wine and beer making, kombucha, and yes, sourdough starter.
In my head I imagine making a recipe, and thereafter everyone I feed my goodies to becoming awfully sick, and leaving me feeling guilty and, well, dumb.
(Sidenote – I was the recipient of a friendship bread starter in school, and I kept it alive exactly 3 days. It has not been a strength of mine historically, but here goes nothing! Hopefully 20 years + a little more knowledge will work in my favor).
As one of my new year’s resolutions I had decided to jump in, and try some easy fermentation projects. That resolution was officially completed with my recent sourdough project.
I did some research and determined that of all the possible fermentation projects out there, sourdough seemed the easiest to embark on.
Corona tip – Can’t find yeast? Make your own! While the recipe I used took advantage of a packet of yeast, there are several that don’t. You may have to wait longer, but the results are the same.
I used this recipe from Allrecipes.com. Additionally, in researching, I did find different recipes and methods tweak the gist of this a little bit, so as a novice I feel like nurturing a sourdough starter is as much an art as it is a science.
Also, when “feeding” your sourdough (why does that bring to mind images of Little Shop of Horrors?) I found recipes that encourage an even split of flour to water, some include a pinch of sugar to boost the yeast, and some have slightly more water to flour.
Whichever method you prefer, the idea is the same. You have a loose plastic or glass (never metal) container that is lightly sealed. Air needs to access it, just like eons ago when sourdough first became a thing (seriously…eons. Romans did it). You create the beginning starter, then toss a bit and feed it every day, hoping the bubbles on top continue to be happy bubbles, and don’t disappear.
You want a fresh, yeasty smell. To me, it smells like craft beer. I suppose it would smell the same as most fermentation projects. If you see a COLOR other than a white or off white (sometimes the liquid is a little to the tan side in mine), that’s a no go. Toss and start over. I’m not talking bread colors – I mean Christmas colors. If your starter has red, green, etc, tinges and complements your Christmas tree, you don’t want a piece of that. YUCK. Toss toss toss. It WILL make you sick.
I keep mine in my laundry room, which tends to stay a few degrees warmer because of my dryer. It seems to be very happy, so I plan to keep it there.
Once your starter is well-established you can keep it in the fridge if you don’t use it often. I also found some people will freeze it. Not sure how the science of it works, since to me I feel like living things would die in temperatures that cold, but I suppose yeast is different.
Today I’m off to make my first sourdough farm boule from my starter. I’ll post the results in an upcoming post. While my sandwich bread bakes in the breadmaker, I plan to hand bake my boule, because all of this breadmaking is making me miss the process.
Something about kneading my own bread is inherently relaxing to me. A close second to my morning yoga.
Have you made your own sourdough starter before? How did it turn out? Any tips for a newbie like me?
I’ve always wanted a bread maker. Even before the current events had happened, I was talking with a friend about how much I wanted one, but that the features in the ones widely available were incredibly confusing to me.
Before this month, any bread I made was with packet yeast and a loaf pan in the oven. Manual kneading (sooo fun, but sooo time consuming), and lots of babysitting. I hated buying store bread – not because I had any qualms about it tasting bad or having odd ingredients (we try to be careful, but I also try not to have too much anxiety over our food choices), but because my Dutch husband always said that when we were in Holland he could walk down the street and buy fresh out of the oven bread, and here we didn’t have any local bakeries (AND live a minimum 20 minute drive from civilization).
So, the more time I spent making bread fully by hand the more the sandwich bread became a mini-obsession. I WANTED to offer this to my husband and family, as if to say, “He he, tell me THIS isn’t fresh.” Plus, I do really like the idea of knowing what I put in my own bread, instead of hoping the ingredient list isn’t too long and I don’t miss some obscure article online about how such and such is really terrible for you, and no one knows it, but it is in our store bread (ahem, preservatives…ahem).
Anywho, I took a leap of faith last month and bought a Cuisinart Convection Breadmaker. I liked the idea of a Convection bread maker, because I had a major distrust of convection baking until very recently (as in, I completely refused to use the feature since getting my first convection equipped oven 5 years ago), and now I’m a solid convert. I still use regular bake and roast sometimes, but the balanced and faster cooking I get with convection is game changing.
The one I purchased is out of stock (isn’t everything these days?!), but if I see it online again I will post the link. For the most part, I would think that most breadmakers would do this recipe similarly.
So, I started with the basic bread recipe from the Cuisinart manual. I don’t know WHAT I did wrong, but I only had 1 good loaf from 4, and every time it would fall right during the last rise. Tears were shed. In retrospect, I think that I’m used to having warmer water due to making bread by hand, and I might have misread my liquid thermometer on the warm side.
That being said, it was difficult for me to use the manual’s recipe anyway, because it called for dehydrated milk and, while I have regular milk on hand most of the time, I rarely have dehydrated, and I didn’t feel like keeping a special stock. Again… I’m all for making my life EASY, and I try not to keep special ingredients on hand just ‘cuz.
I finally found this recipe from King Arthur Flour. The name says it all, but before you go running off to make this recipe, I’ll go through how I whiz through it with a few tweaks every morning. I always go for the larger loaf size recipe.
The first time I made this recipe, I heard my poor machine go clunk clunk clunk all the way through the kneading cycle. The bread came out great, but STIFF. Way too much flour for me.
I added 1/3 of a cup of milk, and have made two loaves since, both of which have the perfect blend of ease, firmness for sandwiches, and airiness for yum factor.
I also like that it calls for all-purpose flour, instead of bread flour, which is also something I have to special order (which I usually try to keep on hand, except when corona decides to hose up my routines…thanks for THAT). I always have way more all-purpose flour anyway, so the fact that I could use it for this recipe was great.
My current operating theory is that I was putting my liquid in too warm, because of the reasons mentioned before, and I also don’t have time to wait for my butter to get to room temperature (do I have a patience-problem? Uh, maybe), so I came up with the following method to make this recipe.
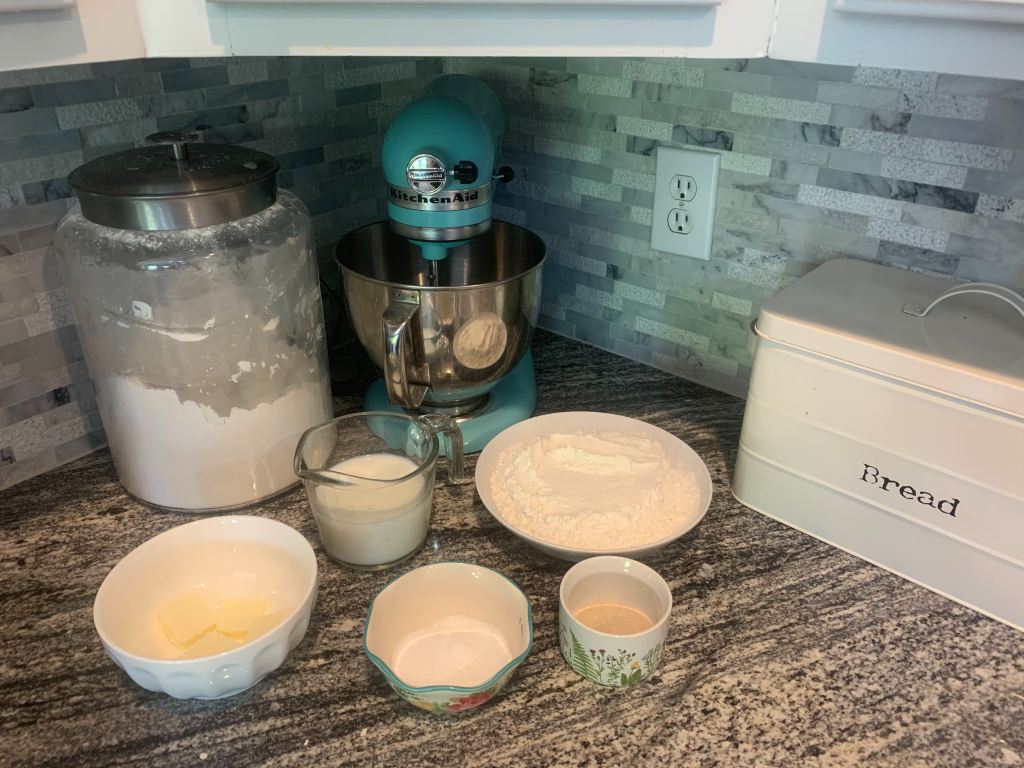
I measure all of my ingredients out FIRST. I use a measuring cup, and put both liquids (lukewarm water + cold milk) into the same cup. I do not heat it up until I am ready to start the maker. Temperature is sooo important (and is a total pill to get right). Picture below. In this picture, the butter and liquids are still cold. We will fix it in a minute. The yeast is, as well, because I have a bottle of yeast and you have to keep it refrigerated, but it doesn’t seem to hurt the recipe.
2. I heat the liquids for 10 seconds in the microwave and take the temp with my kitchen thermometer (after stirring to eliminate hot patches). If you are the patient type, and want to put the butter and liquid out on the counter to warm, I applaud you. I’m not that patient. I have farm stuff to do, and chickens don’t care why their breakfast is late.
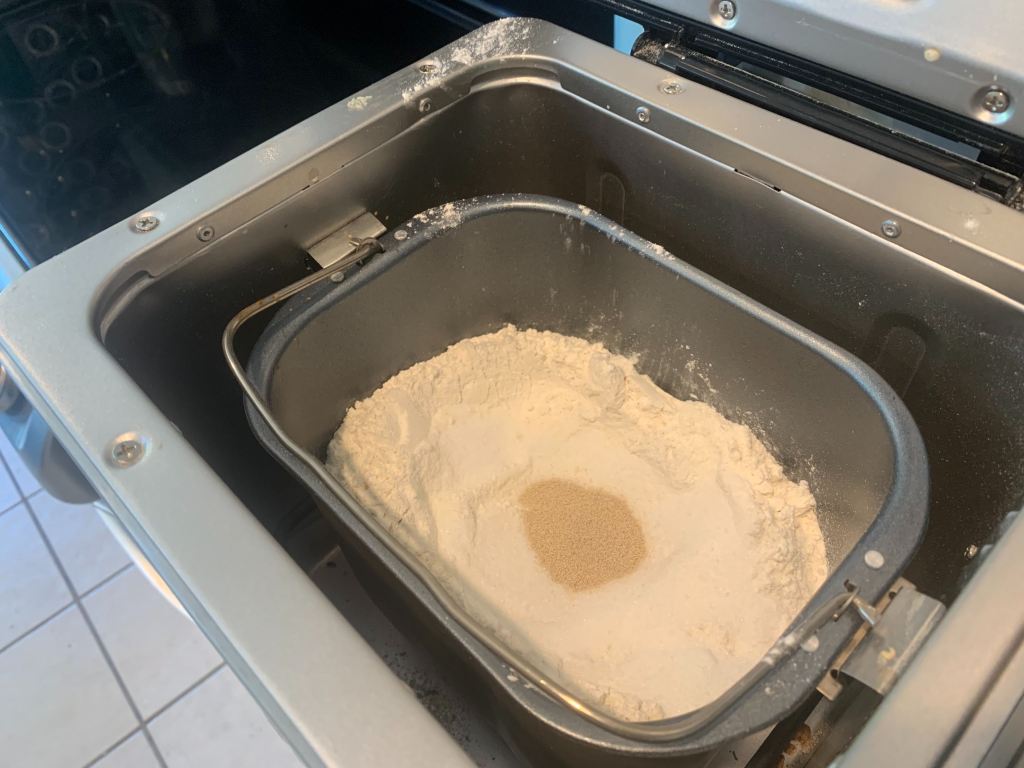
The key with my breadmaker is to use LUKEWARM liquids. Instead of 110 degrees or so, like I use when hand baking, I shoot for 80-90 degrees F. I am thinking since the maker stays so warm it works better this way. I pour my ingredients in in this order (per manufacturer guidelines): liquid, butter – 1/4 of the amount called for in each corner (also warmed for a few seconds, but not too many – 5 maybe – you don’t want it softened at all, just not freezing), flour, sugar and salt (they are both in the smaller middle bowl), and then I make a little hole in the middle, and plunk in the yeast. I tried to get a good picture below, but my kitchen lighting makes it hard not to catch a shadow. See the pretty little yeast nest?
3. I put the maker on white loaf – 1.5 lb – medium crust. Turn off the mix-ins option, hit start and walk away (as much as I like to bake, this makes me feel like I’m cheating a bit, but it is AWESOME). If I am around, I will listen for the pause beep halfway through and take out the paddle so the loaf only has a tiny hole, but quite honestly, again… doesn’t bother me. Bread is bread and bread is yum.
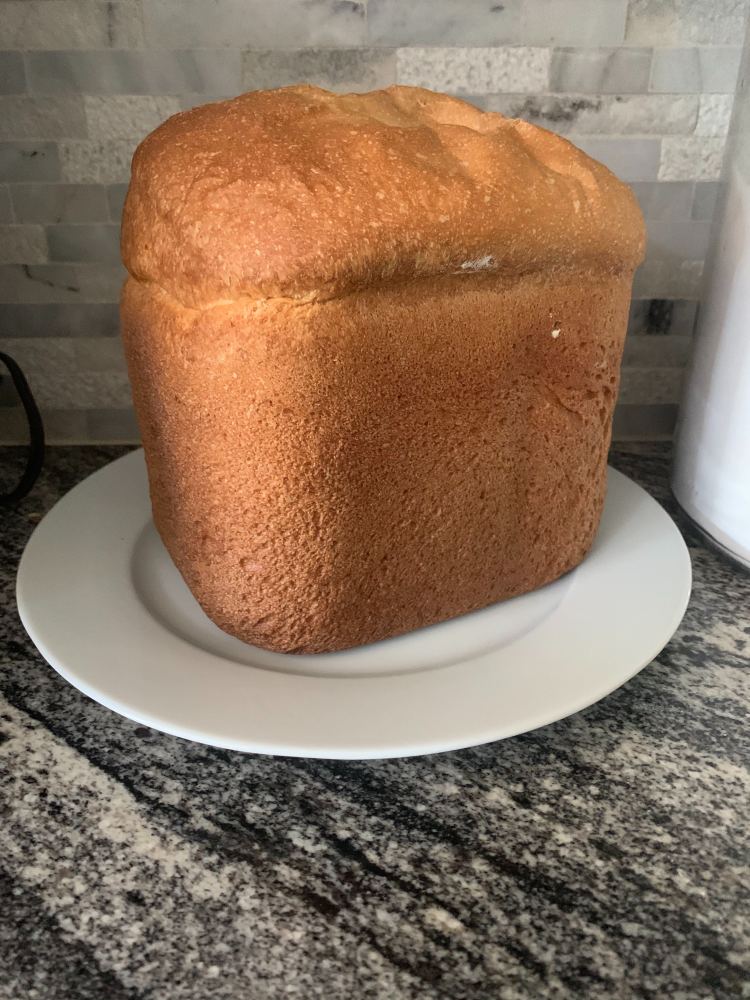
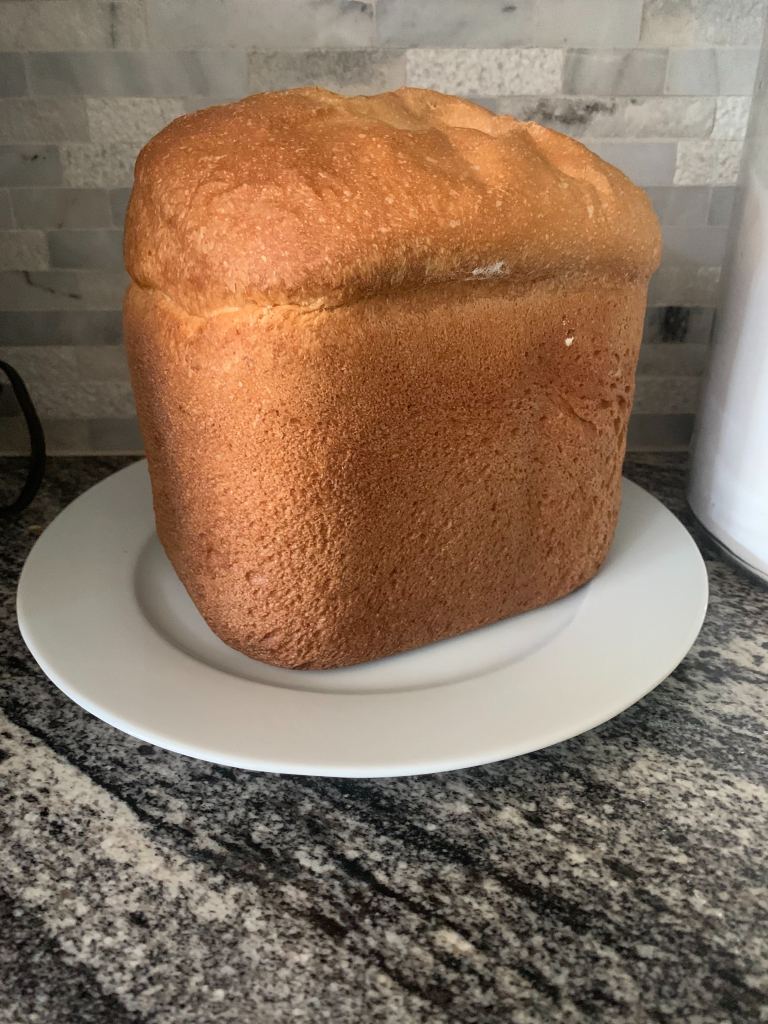
Once it is finished, I will empty it onto a plate to cool. USE OVEN MITTS (or, if you have a retriever that loves to chew oven mitts for some reason completely unbeknownst to me, use a thick kitchen towel). Below is your (hopeful) final result.
PS – If you have trouble, I do know things like humidity can mess with our bread. Post your problem below, and I will Google the heck out of it to try to help, if I don’t know. 🙂
PPS – Working on my first sourdough starter. Will update you on how that goes soon. May not be the next post, but will be pretty quickly behind it if not!
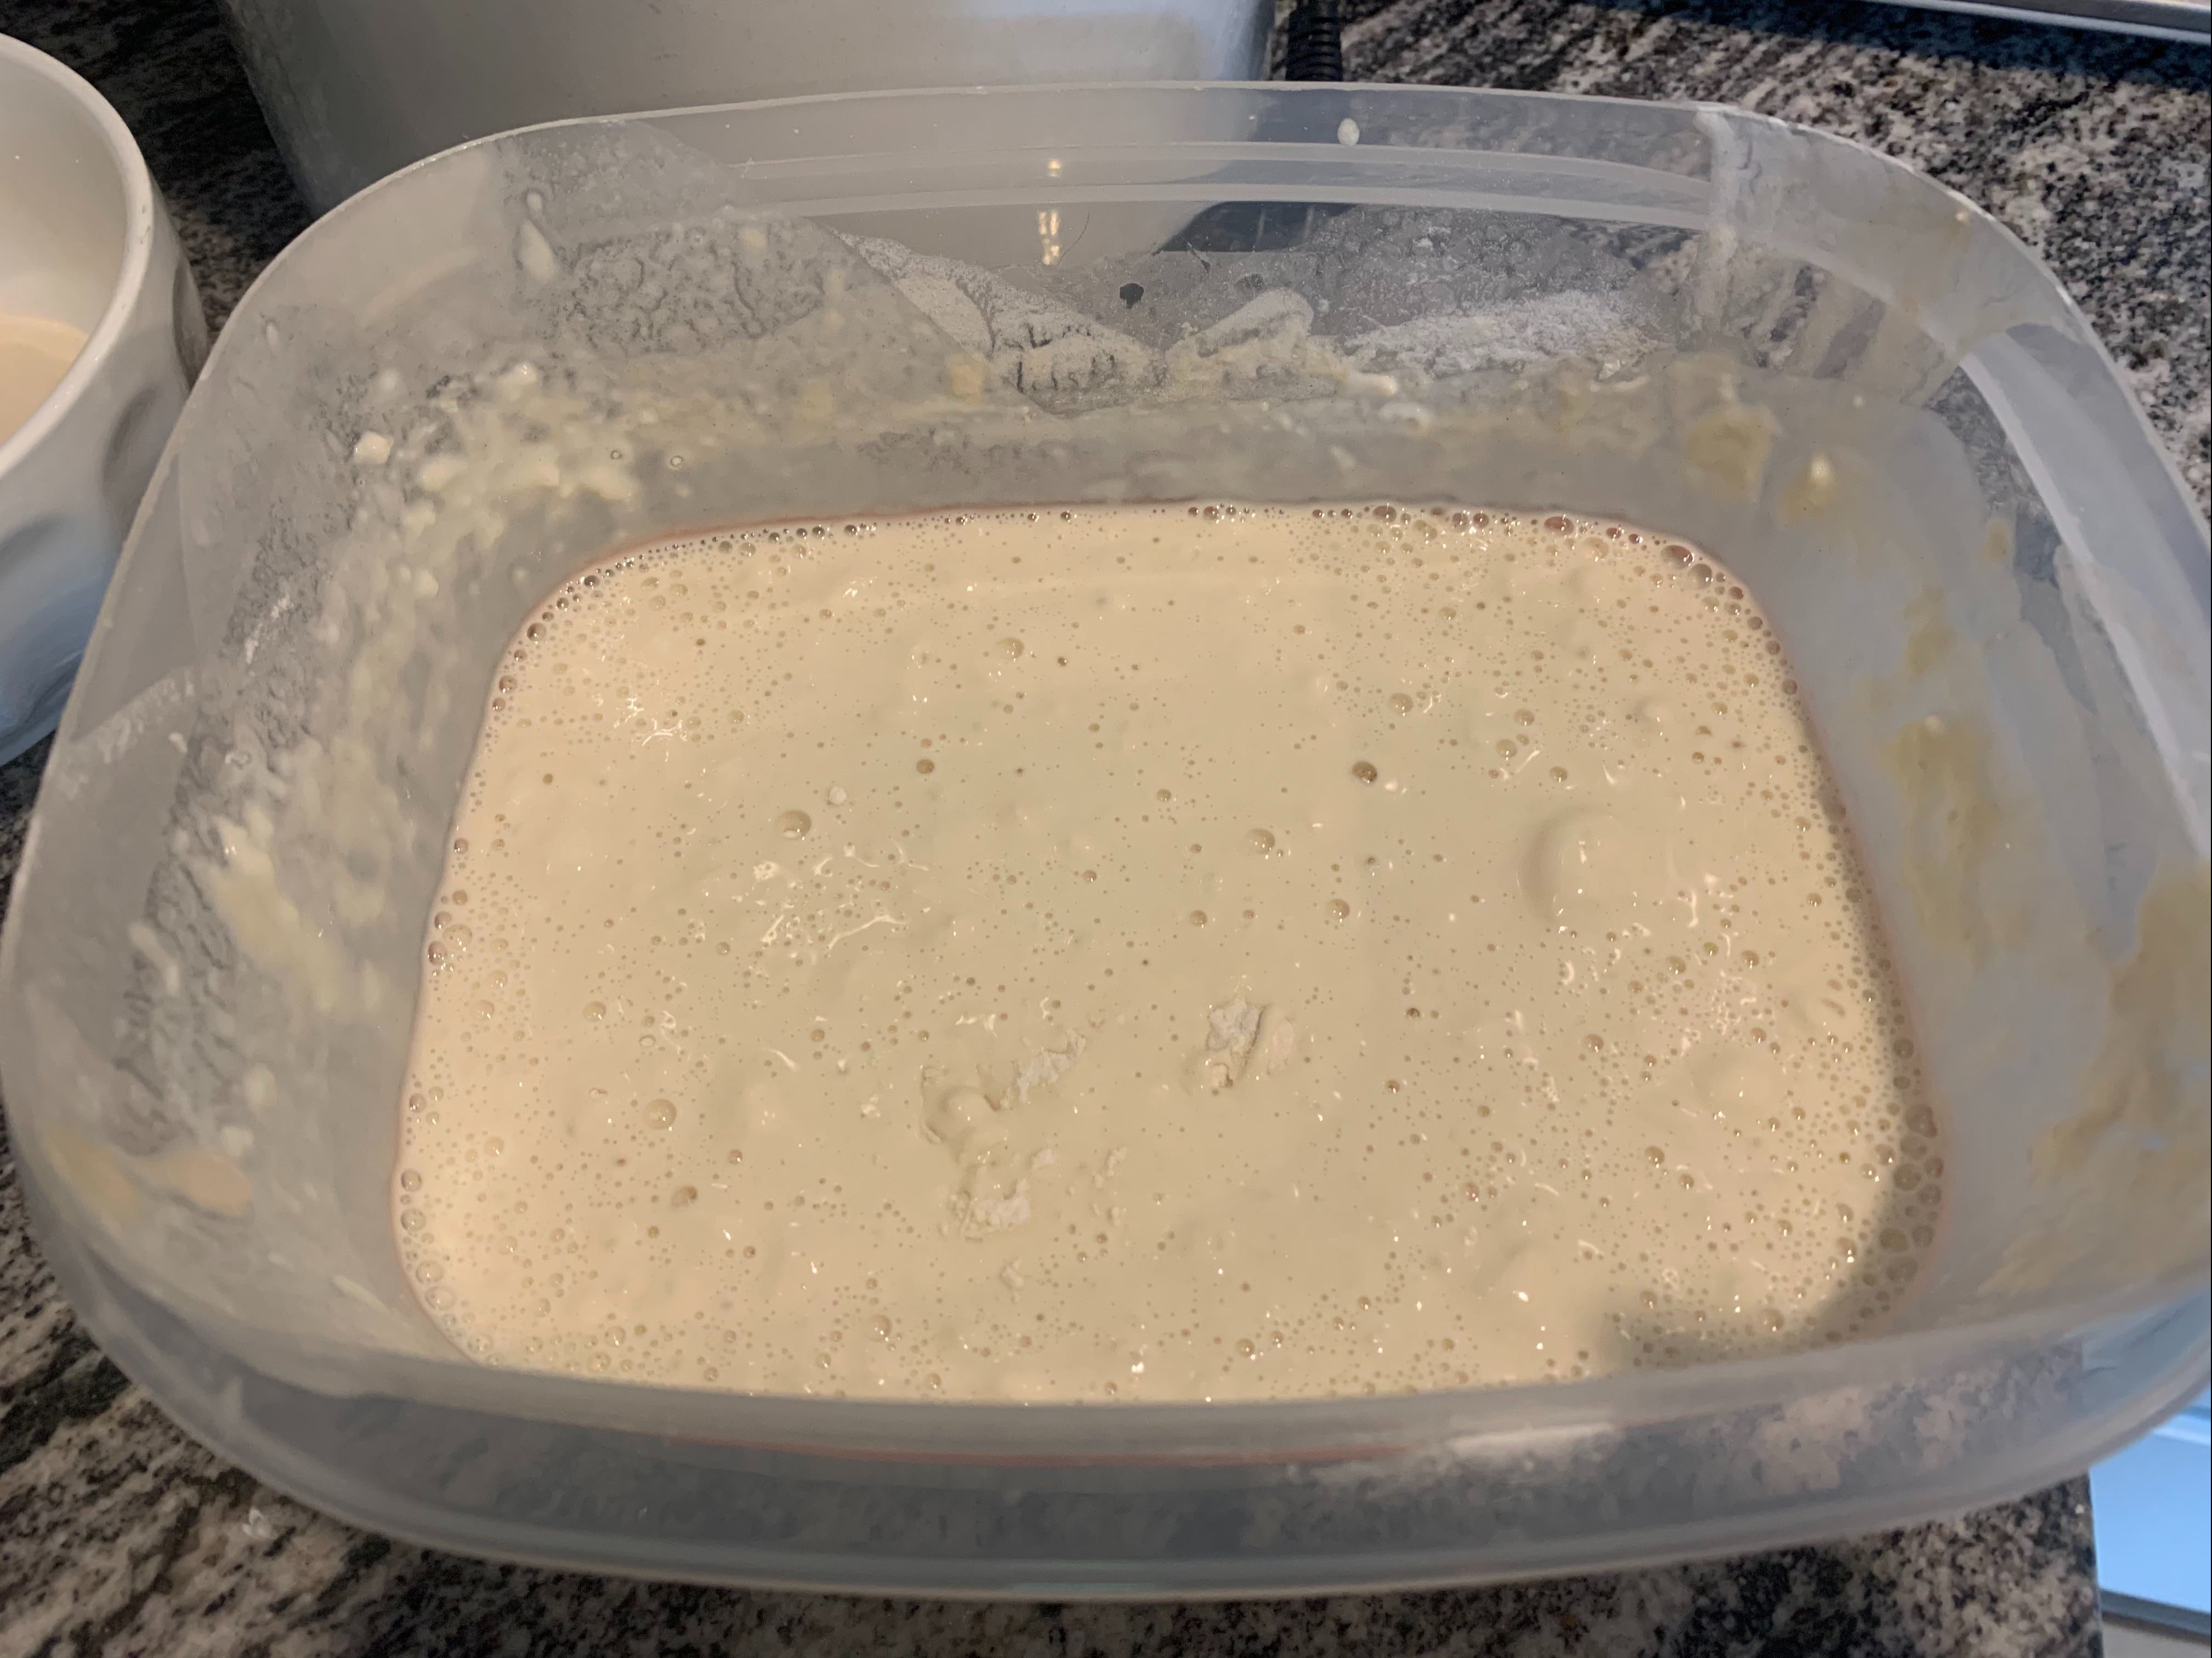
My baby sourdough starter. Today is day 4 or 5.
Hope y’all have fun, and let me know how it goes! If you find some yeast for sale online, let me know! I’m on the hunt!
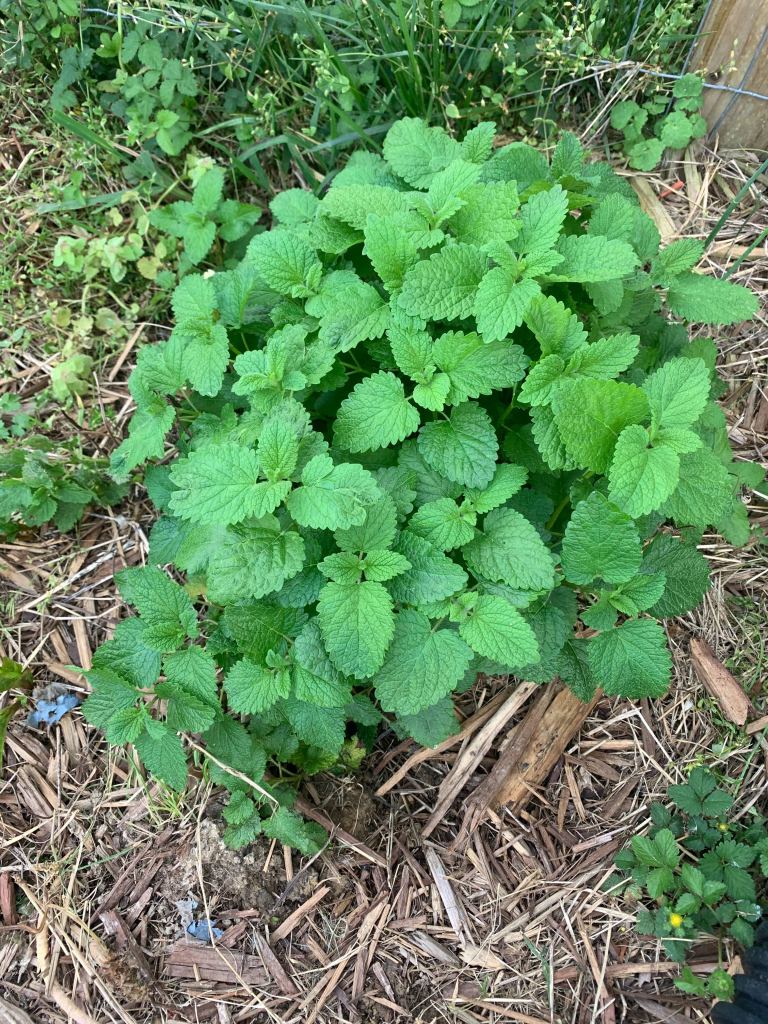
As I was cleaning my front garden up this week, I noticed my lemon balm made it all winter, and was thriving. Unlike my parsley, which also lives a few years but tends to be tough and more for seed collecting in the second, my lemon balm (a member of the Mint family), was thriving and happy.
I am a bit unstructured in my garden. My grandparents were farmers, but I grew up with horses and ornamental gardens, and I am a painter by hobby. The idea of a straight garden plot is fantastic, and I have a few small raised bed plots in the backyard, but I love incorporating my vegetables and herbs into my surrounding ornamental gardens as well. To me, it is a form of creativity, and it also helps me use the space I have more efficiently.
In my mind, every plant has some sort of purpose, even if it is to be ornamental. Why should I separate my food plants from my roses, etc? While on that note, you can use rose hips, so the whole idea of ornamental and food plants being completely different is not really something I think about when planning (unless, of course, something I plant would be dangerous for people or animals, but I try to make sure I don’t plant anything poisonous anyway, as I have littles and chickens and dogs and kitties running about at any time).
This is lemon balm. Similar to mint, the leaves are perpendicular to each other and when you bruise the leaves you get a faint smell of lemon.
According to my research, lemon balm is anti-viral, is a natural anti-depressant and soothes anxiety, helps with allergies and has several other benefits. That being said, I’m not a doctor, but I figure that with the current atmosphere, some lemon balm seemed like a good idea! You can read more about the benefits here.
I decided that based on what I read I would start infusing some lemon balm into my iced tea. Since lemons are in short supply in the garden (my one and only attempt at raising a Meyer lemon ended in a litany of pests and a tree that begged me to let it die), I thought I would use the lemon balm to infuse just a bit of that lemon taste to our regular iced tea.
Make your iced tea as you typically do. I threw in a generous handful of lemon balm, after I used my mortar and pestle to wake up some of the juice and taste.
I have had a mortar and pestle on hand for years. It’s great when using live herbs, because you can bruise the leaves and wake up the smell and taste of any herb you are using. For this, I first lightly bruised the leaves, then threw them in my tea pot along with my tea of choice (a regular black tea is fine, or spice it up with your favorite tea).
I boiled some water. My British father insists on grabbing the kettle just as the water turns to a boil. Why? Not sure, but he makes wonderful tea and I am not arguing with an expert. I place a tea bag per person, and a tea bag for the pot (again, thanks, Dad). Pour the just boiling water over your tea bags and lemon balm, and leave to steep to your preference. It’s not a rigid guideline. I like weak iced tea with no sugar, so I leave mine 5-8 minutes or so. Keep in mind you will be adding ice and water, so make it a little stronger than you prefer.
Once the tea has steeped well, I put a dash of baking soda in a pitcher along with some ice (about 1/4-1/3 of the pitcher), pour my iced tea in, and I add water and the bruised leaves from the pot to fill it to the top, without making it too weak. Discard the tea bags.
Lastly, I throw it in the refrigerator to chill. It’s pretty tough to mess up, and my whole family runs through it in no time flat. I usually make a pitcher every day or two now, at the same time I’m making our bread. I’ll work on that post next! Here is our loaf from today. Yes, I use a breadmaker, and I will share that model with you as well (I make some breads by hand, as well, but I use the maker for our sandwich bread).
YUM.
If you have any tips or questions on your family iced tea, let me know. I would love to hear them!
We have had a quiet few years. I’ve added on to the front and the back of the house with fence for the dogs, added some raised beds, and we still have chickens. I wasn’t able to work on the blog much, due to work and other projects, but the recent quiet and social distancing has brought our family to a place where we miss seeing our friends and neighbors.
I only see my parents when I deliver supplies. Worrying about my father, mother and other family members and friends catching this super flu was stressful at first, but my husband dove into a short story project (silver lining – he is finally writing, as I have been begging him to for years), and I’ve whole heartedly dove into our garden and raising our food this year.
Somehow, returning even more to self sufficiency has helped me stay resilient and focus on our family as a priority. I will post some of our projects here, and hopefully they can give other families ideas if they want to also “baby step” into homesteading.
I will start posting some of our projects tomorrow. I can’t wait to share our progress, and hopefully our family can keep up with us as well!
Katie
PS – God bless all, and we will get through this. Return to victory gardens and our neighbors. I feel like this has been a massive reset for many of us, and a reminder of what is truly important. Praying for everyone.


![The [Edited] Easiest Sandwich Bread Recipe On The Planet](https://jumpingdog.farm/wp-content/uploads/2020/04/image-from-ios-4.jpg?w=863&h=0&crop=1)